Monday, October 17, 2011

Columbus Day

To celebrate Columbus Day, we made Columbus' three ships - the Niña, Pinta, and Santa Maria.

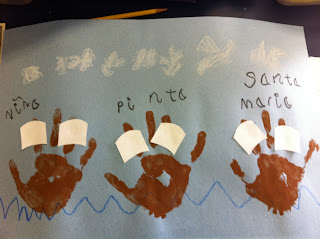
I gave each student a long piece of light blue construction paper and had them draw waves with a blue crayon and clouds with a white crayon.

I painted their hands (one hand three separate times) with brown paint. Once dry, we took small squares of paper and glued them on to make sails.

The students also wrote the names of the ships so they could remember when they told their parents.


Make your own Jack-o-Lanterns

I know I haven't blogged in awhile, so here is the first of two for tonight. With Halloween approaching, I did one of my all-time favorite projects with the kids...make your own Jack-o-lanterns. As you can tell from the pictures, they are all different, but fits each student's personality to a tee!

I give each child a piece of orange construction paper and a half sheet of black construction paper. I tell them to draw a circle for their pumpkin on the orange paper, and a nose and mouth on the black paper. I usually draw examples of different noses and mouths on the board to give them some ideas.

I also let them choose the size of googly eyes they want. I have everything ranging from extra small to extra large. My favorite jack-o-lanterns are always the ones with two different sized eyes!

After students have cut out their pumpkin, nose, and mouth, I give them another black piece of construction paper to glue it on to.

This year, I decided to have them put on a stem and a leaf. I gave them a small sheet of brown paper for the stem, and drew different types on the board as examples of what they could draw. I also gave them a folded piece of green paper and told them to draw a semi-circle on the crease (this makes the leaf).

I loved how these turned out and am anxious to do the same thing with snowmen for Christmas! :)


Sunday, October 2, 2011

Subway Art...Take 1

So here is my 1st attempt at subway art. I love Halloween; so I decided that this would be the best subject matter - now that it is October!

All I did was grab an 11 x 14 canvas, Mod Podge, and a whole bunch of different words. All of my fonts came from either Lettering Delights or dafont.com. Lettering Delights costs money, but you can usually get fonts on sale. Dafont.com on the other hand is all free!

After I printed out my words, I cut them out and used Mod Podge to glue them on to the canvas. I let it dry, and then put a coat of Mod Podge over the entire canvas. That's all I did, and I must say…I LOVE it!!